
BETA/FINAL PROTOTYPE (P)
-------------------------------------
Instructions: This is it -- your final project assignment. Create a nice collection of information that describes the results of your project.
Task: Your submission should include at least:
1. The name you will give your artifact. This could be a brand or product name if you are doing something in a commercial context, or could simply be what you will
call this artifact. I would like you to use your skills in naming from the video modules this week to create this name.
2. One or more nice images of your prototype. (In most cases this will be a photograph, but in the case of websites or other non-physical artifacts, you may use
other types of images.) Provide some annotation or explanation of the artifact if needed to understand how it works and its key features.
3. Some background on the gap you addressed and your problem definition (e.g., the key user needs).
4. A very short (i.e., one paragraph) description of what the next steps would be to further refine and develop your artifact.
5. Any other information you feel might be interesting to your classmates, or relevant to evaluating your work.
This information need not be lengthy. You can probably provide this information in the equivalent of 1-2 pages. However, you are welcome to provide more detail.
Just, be sure that the important information (i.e., items 1-4 above) are presented clearly and concisely so that someone can easily understand what you have done.
Please submit both Website URL and PDF file. (For more info, check Your Project Website tab on the left.)
MY GAP
-----------
Salt dispenser that dispenses a set amount of table salt consistently
Gap Refinement (week 6)
----------------------------------
Salt dispenser that dispenses a set amount of table salt consistently and, if needed, changes the amount of salt dispensed.
PRIMARY USER NEEDS
------------------------------
* Salt dispenser handles most sizes & types of table salt
* Salt dispenser handles changing needs of the amount of salt
* Salt dispenser is being used in any kind of environment
* The amount of salt being dispensed is visible
* Salt dispenser is user friendly
* Salt dispenser is ergonomically designed
* Salt dispenser is visually appealing
* Salt dispenser is small
* Salt dispenser is light weight
* Salt dispenser is simple and easy to assemble
* Salt dispenser is easily available
Refined prototype (beta) from the last week (alpha)
---------------------------------------------------------------------
I have made the following refinements in my beta prototype from my alpha prototype.
1. After reviewing my alpha, I realized that the salt dispenser should be calibrated. Users need to know the minimum and maximum amount of the salt that can be dispensed in one serving. For the base line, I considered that the dispenser should dispense a pinch of salt in each serving. This is kind of an average person's need. My core idea has 6 holes for the salt to come out in each serving. The diameter of each hole of 1/16" and the total effective area of the 6 holes is .018 sq. in. which is about one large hole with diameter of .153" (about 10/64" dia, 3.90 mm dia). When all 6 holes can be used, this is the maximum amount of salt that can be dispensed in one serving (one turn of the dispensing knob). Adjusting the position of the inner tube would let me block 1 to 3 holes (I can utilize only the remaining 3 holes). This way I would reduce the amount of salt to half pinch in each serving. So the minimum to maximum salt that can be dispensed in one serving is half pinch to one pinch.
2. My alpha has a diameter of the dispensing knob large (2 1/4") and users needed two turning actions to complete one turn. I used a smaller knob (1 3/4" dia) so one turn can be finished in one turning action.
3. My alpha does not have a starting / stopping mark on the dispensing knob and to work perfectly it is required. I added a marking on my beta for this purpose.
4. My alpha looks a bit like a toy so I wanted to give the beta a better shape & look. I used different components to give it a better shape & look. I did some minor design changes as well as it can be seen in the pictures.
5. In my alpha, the height of the salt container was less than 50 % of the total height of the dispenser. Salt container in my beta has a height of about 65% of the total height of the dispenser.
6. One of my primary needs is "the amount of salt being dispensed is visible." I used a black disc at the bottom (I call it a salt distribution system / disc) to give a sense of visibility to the salt being dispensed. White salt on a black background (black disc) would give the maximum contrast hens the maximum visibility.
1. Named of my artifact
---------------------------------
* I followed the "name design process" to find a name for my salt dispenser. I used different methods explained in the video to come up with about 50 words. After evaluating each name, I ended up with the following 20+ names.
Saline, Salty, SoChlo, Salting, Salted, Salter, Sealt, Saldus, Hals, Sal, Briny, Salten, Salz, Salta, Zouten, Zout, Salzan, Soli, Salann, Saldis, Saltu, Prosalt, EasySalt
| Length (N) | Length | Association | Spelling | Tone of brand | Easy of saying | Total points | ||
| 1 | Saline | 6 | 2 | 3 | 3 | 2 | 3 | 13 |
| 2 | Salty | 5 | 2 | 3 | 3 | 2 | 3 | 13 |
| 3 | SoChlo | 6 | 2 | 0 | 1 | 1 | 1 | 5 |
| 4 | Salting | 7 | 1 | 3 | 3 | 2 | 2 | 11 |
| 5 | Salted | 6 | 2 | 3 | 3 | 2 | 2 | 12 |
| 6 | Salter | 6 | 2 | 3 | 3 | 3 | 3 | 14 |
| 7 | Sealt | 5 | 2 | 3 | 3 | 1 | 1 | 10 |
| 8 | Saldus | 6 | 2 | 3 | 3 | 1 | 1 | 10 |
| 9 | Hals | 4 | 3 | 3 | 3 | 1 | 2 | 12 |
| 10 | Sal | 3 | 3 | 2 | 3 | 1 | 3 | 12 |
| 11 | Briny | 5 | 2 | 2 | 3 | 3 | 3 | 13 |
| 12 | Salten | 6 | 2 | 3 | 3 | 1 | 3 | 12 |
| 13 | Salz | 4 | 3 | 3 | 3 | 1 | 2 | 12 |
| 14 | Salta | 5 | 2 | 2 | 3 | 2 | 3 | 12 |
| 15 | Zouten | 6 | 2 | 3 | 3 | 2 | 3 | 13 |
| 16 | Zout | 4 | 3 | 3 | 3 | 1 | 2 | 12 |
| 17 | Salzan | 6 | 2 | 3 | 2 | 2 | 3 | 12 |
| 18 | Soli | 4 | 3 | 3 | 3 | 1 | 3 | 13 |
| 19 | Salann | 6 | 2 | 3 | 3 | 1 | 2 | 11 |
| 20 | Saldis | 6 | 2 | 3 | 3 | 1 | 1 | 10 |
| 21 | Saltu | 5 | 2 | 2 | 3 | 3 | 3 | 13 |
| 22 | Prosalt | 7 | 1 | 3 | 3 | 1 | 3 | 11 |
| 23 | EasySalt | 8 | 1 | 3 | 3 | 3 | 3 | 13 |
* I used the name design process for these 20+ names and ended up with the following names. These names got 13 to 14 points out of the 15 total points.
Saline, Salty, Salter, Briny, Zouten, Soli, Saltu, EasySalt
* I could not use the following names because either unavailability of the domain name or the name is already in use.
Salter, Briny, Zouten, Soli
* I now have the remaining following names to choose from.
Saline, Salty, Saltu, EasySalt
* After checking with my family and friends as well as neighbors, I decided the product name "Salty" for my salt dispenser.
2. Images of my prototype
------------------------------------
* The following image shows subassemblies and all the components.
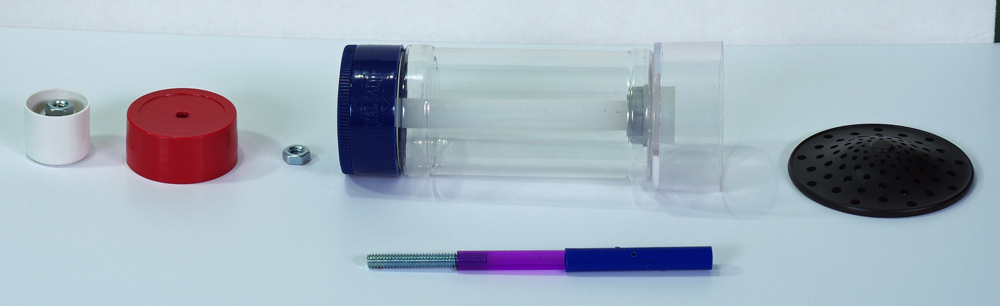
There will be the following two final subassemblies.
Subassembly# 1: The container with blue lid, white tube inside of the container (it is glued to the bottom of the container) and the black disc glued at the bottom.
Subassembly# 2: Blue & purple tubing with a screw, a nut, red turning knob (to dispense the salt) and the white knob & nut assembly (to adjust the amount of salt per serving).
There is a transition fit between the white tube and the blue tube. Blue tube, purple tube and the screw are glued together and acts as one piece. The whole subassembly# 2 can be pulled out with a little force and the blue lid can be opened up to fill up the new salt into the container.
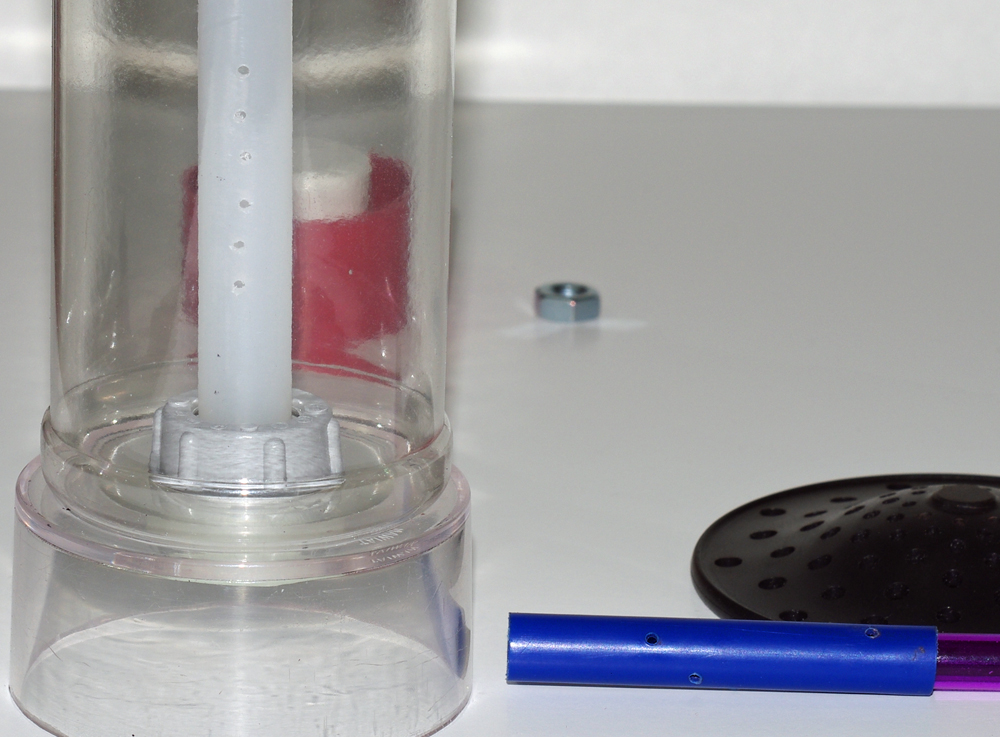
The following image is my core idea that includes 6 holes in a straight line on the white tube and 6 holes in a helical configuration on the blue tube.
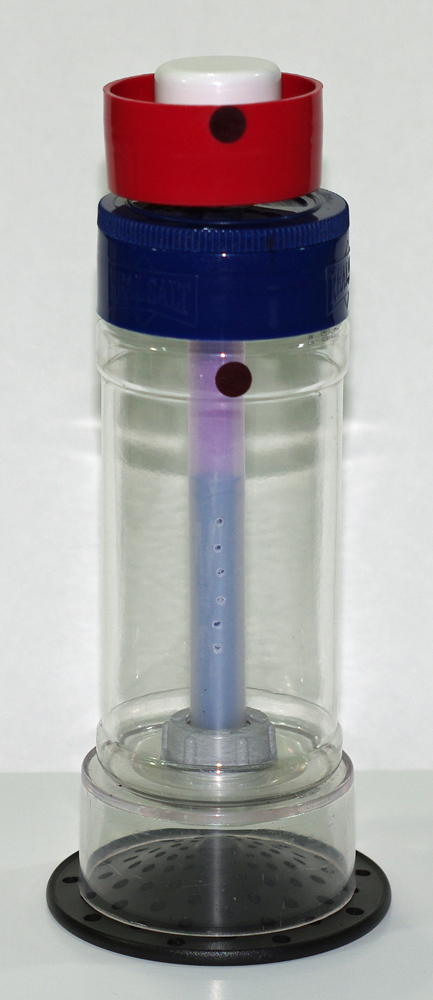
The following image if my final beta product. This is my newly named "Salty."
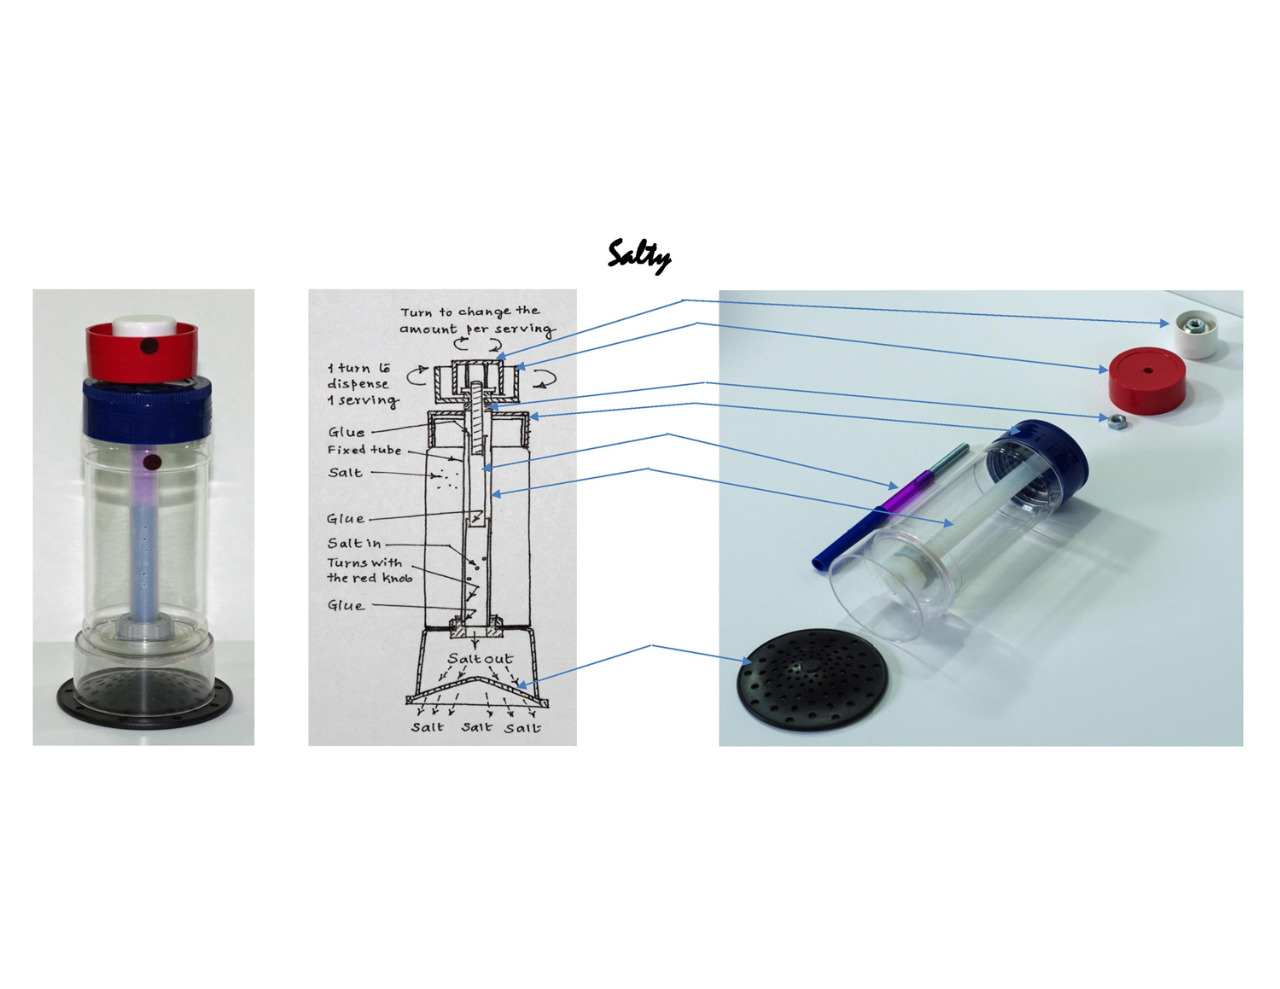 How How it works
------------------
Turning the red knob once (1 turn, 360 degree exact) would allow the 6 holes on both tubes to get engage and would allow salt to escape from the container to the blue tube. From here the salt would fall on the black disc and would be distributed randomly thru the holes on the disc. This is one serving which is equivalent to shacking the salt dispenser once. There are markings to control the 360 degree turn. It has to be exactly 360 in each and every servings. I have designed the tubing holes in such a way that about a pinch of salt would be dispensed in each turn. If you want more salt, you turn 2, 3, 4, ... turns.
Now if you think the serving in one turn is too much for you, you can mask some of the holes so fewer holes would get engaged between the white and blue tubes and so less salt would be dispensed. This adjustment can be done thru the white knob on the top. Bu turning the white knob, it would pull the blue tube up there by reducing the number of hole engagement. This arrangement would allow me to make a minimum of 3 holes (half pinch of salt in one turn) to a maximum of 6 holes (one pinch of salt in one turn) engagement.
The moist salt with clumps won't give any problem to the user. The shear action between the white & the black tube would break the lumps when it would come across any two engaging holes on the two tubes.
3. Background on the gap and problem definition
------------------------------------------------------------------
I initially started with the following gap.
"Salt dispenser that dispenses a set amount of table salt consistently"
I refined my gap in week 6 and following is my new gap.
"Salt dispenser that dispenses a set amount of table salt consistently and, if needed, changes the amount of salt dispensed."
I noticed that the existing salt shakers have the following problems.
-- Every time I use a salt shaker, I have no idea of how much salt is coming out of it; I cannot see it. I have to go by trial and error until I am satisfied with my taste.
-- If the salt grain size is larger than the holes on the salt shaker, salt won’t come out of it. Salt comes in different sizes ranging from very fine to very coarse like kosher salt. One salt shaker won't work for all grain sizes.
-- In humid environment, the salt grains accumulate around the holes and reduce the size of hole openings, which reduce the functionality of the salt shaker. The same happens with the salt inside the salt container.
I came up with an idea that addresses all the problems that I noticed as well as a few more important features (key user needs).
My salt dispenser would have the following main functional features. These features are required for my salt dispenser to function correctly. I have addressed all these key user needs in my product.
* would handle most sizes & types of table salt
* would change the amount of salt being dispensed in one serving
* would handle salt with moisture
* The amount of salt being dispensed would be visible
My salt dispenser also would have the following features that are not functional and does not affect the functionality of my salt dispenser. I have addressed all these key user needs in my product.
* Salt dispenser is user friendly
* Salt dispenser is ergonomically designed
* Salt dispenser is visually appealing
* Salt dispenser is small
* Salt dispenser is light weight
* Salt dispenser is simple and easy to assemble
* Salt dispenser is easily available (this is possible only if I go commercial)
4. Refinements and next steps
-----------------------------------------
My beta is much improved over my alpha but still needs some improvements. I have used many components to make beta. This would add costs in terms of component cost and assembly cost due to manual labor. I see opportunity in reducing the number of components. Except a screw, a washer and two nuts I used plastic for all other components. The most common manufacturing method for plastics is injection molding in which molten plastic is injected into a mold that makes plastic components. We can combine some related parts into one part and can use injection molding method to make that one part as one piece. The mold is expensive so we can use injection molding only in mass production to justify the cost of the mold. Reducing the number of components would reduce the assembly time and so the assembly labor cost.